

WE SHOW YOU HOW TO TIE PROFESSIONAL-QUALITY SABIKI RIGS WITH EASE
Fishing a sabiki rig for European whitefish (also known as whitefish, vendace or coregonids), perch, char, trout and many other species can be an exciting and exceptionally productive way to fish – and it is certainly worth trying. From small mountain lakes and large pre-Alpine lakes to reservoirs and lowland lakes, a sabiki rig can help you enjoy excellent catches in a wide variety of waters. Thanks to the two most common approaches – fishing either with a specialised jigging rod or a float rod – sabiki fishing can be practised both from the bank and from a boat. In this article, we will provide you with all the information you need to tie your own custom sabiki rigs perfectly from scratch.
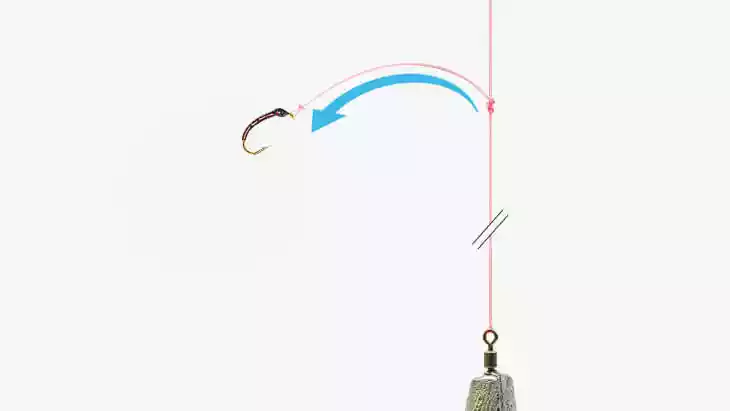
Tying your own sabiki rigs is surprisingly easy
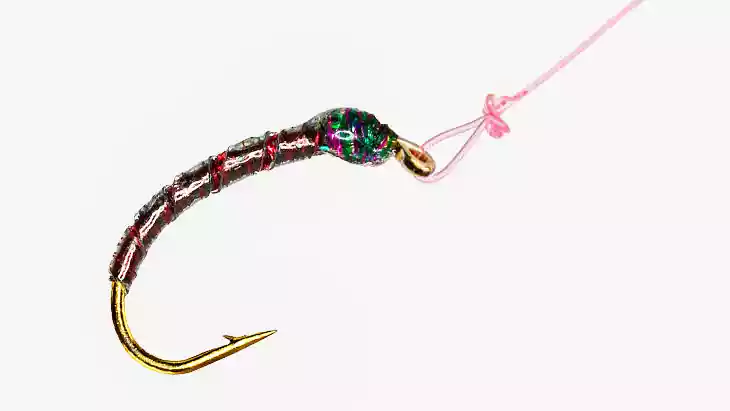
In this article, we will show you everything you need to know
At a glance:
-
To tie your own sabiki rigs, you essentially only need two simple knots.
-
When attaching the nymphs, it is important that they are mounted on a small loop, giving them maximum freedom of movement and allowing them to move naturally and attractively in the water.
-
We recommend using fluorocarbon for tying sabiki rigs. A diameter of 0.18 mm is an excellent all-round choice for many situations and target species.
-
The side arms, also known as droppers, should be tied so that they point upwards. This allows them to stand proud in the water and enhances the natural movement of the nymphs.
-
The overall length of the sabiki rig depends on the number of nymphs used (3 or 5) and where it will be fished: close to the bottom or in open water. To ensure comfortable handling both from the bank and from a boat, the rig should generally not exceed 2 metres in length.
-
The spacing between the side arms should be between 20–30 cm (bottom-fishing sabiki) and 40–50 cm (open-water sabiki).
-
The side arms should ideally measure between 2 and 4 cm in length.
-
To transport your sabiki rigs safely and prevent kinks in the line, store them on round rig winders.
Especially when starting out, it can be very practical to use ready-tied sabiki rigs. As one of the leading suppliers, our online shop offers a wide selection of highly effective sabiki rigs for different target species. With professionally tied sabikis, you can also rely on proven nymph combinations. In addition, the line materials, side-arm lengths, nymph spacing and, of course, the knots used have all been carefully matched and optimised.
1. TYING YOUR OWN SABIKI RIGS
There are, however, plenty of good reasons to tie your own sabiki rigs:
-
Break-offs are an inevitable part of sabiki fishing. Whether it is a pike or a large lake trout that overwhelms your delicate setup, or simply a snag while netting a fish or manoeuvring in the boat, accidents happen. Rather than discarding a partially damaged rig, you can simply use the remaining nymphs to tie a new sabiki.
-
Some waters only allow a specific number of nymphs per rig. If your box contains only 5-nymph sabikis, but the water you are fishing permits a maximum of 3 nymphs, it is far better to tie a new rig than simply cutting two nymphs off an existing one.
-
As your experience on a particular water grows, you will develop a feel for the most productive nymph combinations and the ideal rig configuration. Alongside ready-tied sabikis, our online shop also offers a growing range of individual sabiki nymphs in various patterns that can be purchased separately.
-
Successful sabiki fishing also means knowing where the fish are holding and, above all, at what depth. A rig fished directly on the bottom will not always produce the most fish. When fish are suspended mid-water, sabikis with greater spacing between the side arms allow you to cover a larger section of the water column much more effectively.
-
Once you start tying your own sabiki nymphs, there is really no way around learning to tie your own complete sabiki rigs as well.
-
As you will see, tying sabiki rigs is far from complicated. With a little practice, you will soon be producing your own custom rigs in no time. We will also show you the necessary knots in dedicated videos, making every step easy to follow and replicate.
2. CHOOSING THE RIGHT FISHING LINE
The choice of fishing line is fundamental to the performance of a well-balanced sabiki rig. Several factors need to be considered:
-
Visibility
-
Breaking Strength
-
Action
Visibility: In many waters, particularly in Alpine and pre-Alpine regions, you will be fishing your sabiki in extremely clear water. Unlike in rivers with turbulent currents, fish in stillwaters have plenty of time to inspect a potential food item closely. For this reason, you should always choose transparent, low-visibility lines whenever possible.
Note: For the photos and videos in this article, we have deliberately used coloured lines to make the knot-tying process easier to see. For your own sabiki rigs, however, you should always choose the most inconspicuous line possible.
Breaking Strength: As with any fishing method, the strength of your line should be matched to the fish you expect to encounter, while still allowing for a reasonable safety margin. The guiding principle remains the same: “As light as possible, as strong as necessary.” This not only improves presentation but also helps keep fights short and fish-friendly.
The fine, soft and highly flexible rods used for sabiki fishing certainly help during the fight by absorbing head shakes, sudden runs and abrupt changes of direction. When fishing in open water from a boat, snags and underwater obstacles are generally rare as well. Nevertheless, there is always the possibility of hooking an unexpected pike or lake trout attempting to snatch a hooked whitefish or perch from the rig. In situations like these, having a little extra breaking strength provides welcome security. When targeting perch, food competition can even lead to two fish being hooked at the same time, which places additional demands on the line.
Action: Here we are referring to the movement of the nymph on the side arm. By selecting the right line material, an appropriate diameter and the correct knot, the side arms will stand away from the main line properly, allowing the nymphs to pulse and move attractively when worked with the rod or when animated by the movement of a float.
Based on many years of experience, we believe that fluorocarbon meets all of these requirements exceptionally well. Its refractive index is very close to that of water, making it almost invisible even in crystal-clear conditions. Fluorocarbon is also slightly stiffer than nylon, helping the side arms stand away from the main line rather than hanging limp alongside it.
For European whitefish fishing, we generally recommend a diameter of 0.18 mm, although 0.16 mm can be effective in certain situations. Some whitefish anglers go even finer, but this is not something we would generally advise. When targeting perch or twaite shad, a slightly stronger diameter is perfectly acceptable. In these situations, 0.20 mm to a maximum of 0.22 mm remains highly effective.
Here you can find premium fluorocarbon fishing lines for tying your own sabiki rigs. We can particularly recommend the products from Hotfly, as their stated diameters and breaking strengths have consistently proven reliable.
Incidentally, we use the same line material and diameter for both the main line section and the side arms. While using a thinner line for the side arms may further reduce visibility and create a deliberate weak point, it also compromises the ability of the side arm to stand correctly and present the nymph with maximum freedom of movement.
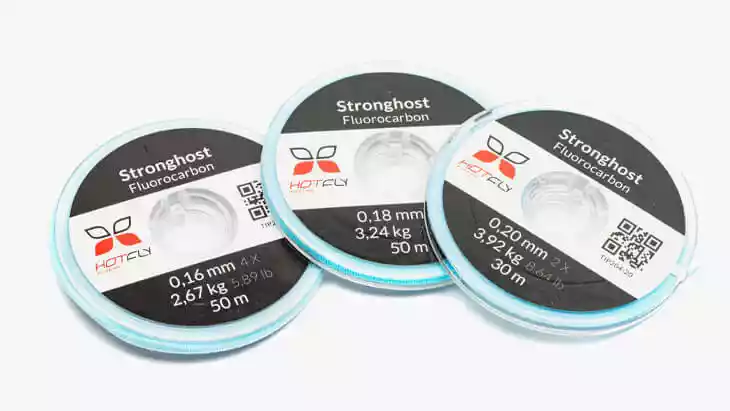
We recommend using fluorocarbon when tying sabiki rigs
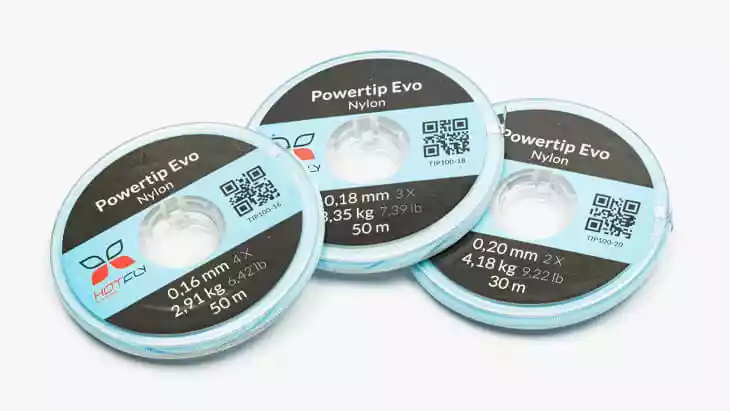
However, there are also several good reasons to choose nylon
Of course, sabiki rigs can also be tied using nylon fishing line. Compared to fluorocarbon, nylon offers higher breaking strength at the same diameter, but it is slightly more visible underwater and also softer, which affects how well the side arms stand out from the rig. Cost is another factor worth considering, as nylon is significantly less expensive than fluorocarbon.
The common argument that nylon provides additional cushioning due to its greater stretch is less relevant for sabiki rigs, which are typically no more than two metres long. This characteristic plays a much larger role in the main line used on the rod itself. Since this article focuses exclusively on how to tie a sabiki rig, we will not go into detail about the long-running debate over whether braided or monofilament main lines are superior for sabiki fishing. Suffice it to say that a braided line offers exceptional sensitivity, allowing you to detect even the slightest take, while the stretch of a monofilament line acts as a shock absorber when fighting larger fish and helps prevent the fine hooks from pulling free.
3. THE KNOTS
Now that we have identified the ideal line for constructing a sabiki rig, it is time to look at the knots used to attach the nymphs to the side arms and then connect the side arms to the main line of the rig. Over the years, two particular knots have proven especially effective. They are quick and easy to tie, highly reliable, and their specific characteristics help maximise the natural movement of the nymphs.
When tying several sabiki rigs, it makes sense to work as efficiently as possible and follow a logical sequence. We therefore always begin by preparing the side arms to which the nymphs will be attached. Only once every nymph has been tied to a suitably long section of line do we start attaching the side arms to the main line.
3.1. ATTACHING THE NYMPH
We use a simple loop knot to attach the nymph to a sufficiently long piece of line, which will later become the side arm of the sabiki rig. The loop is absolutely essential, as it gives the nymph the freedom of movement required to imitate the natural movements of ascending chironomid larvae when the rig is worked rhythmically with a jigging rod or animated by wave action beneath a float.
Take a piece of line approximately 20 cm long, pass it through the hook eye and double it back. In the doubled section, form a loop large enough to pass the nymph easily through it from back to front. In terms of knot strength, we have not observed any significant difference between passing the nymph through the loop once or twice. However, a single pass results in a more discreet knot. A dubbing needle or even a simple nail can be used to control the size of the loop.
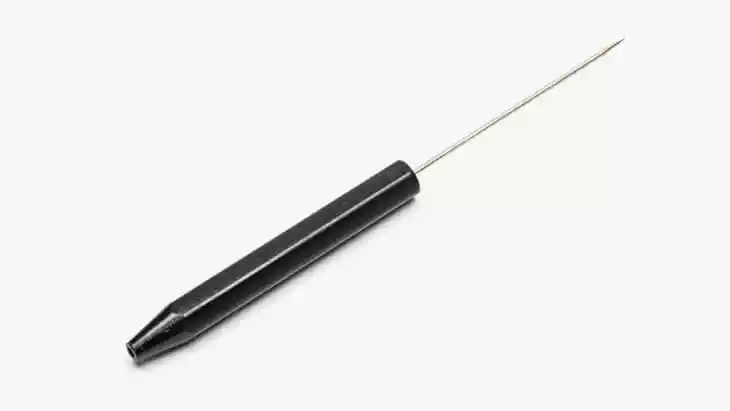
Consistent loop sizes can easily be achieved with a dubbing needle...
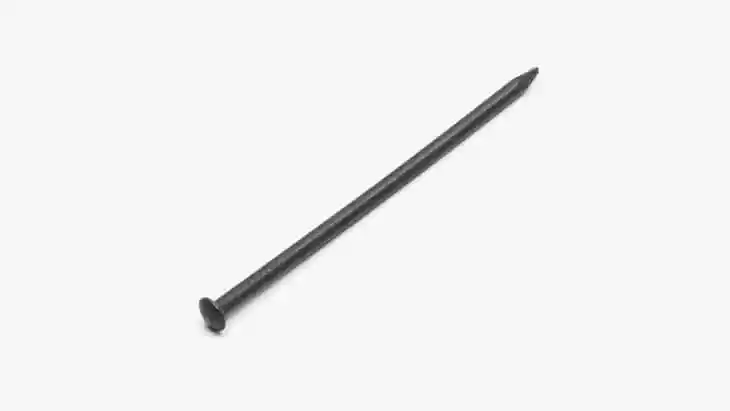
...or a nail. Its diameter determines the final loop size
Simply insert the needle or nail into the loop before tightening the knot completely. Tighten the knot partially, remove the needle or nail, and then pull it fully tight. The diameter of the needle or nail determines the size of the finished opening. A loop measuring between 2 and 4 mm is ideal. If in doubt, make it slightly larger rather than too small. Before fully tightening the knot, lightly moisten the line. Finally, trim the tag end neatly and closely to the knot – and the nymph attachment is complete.
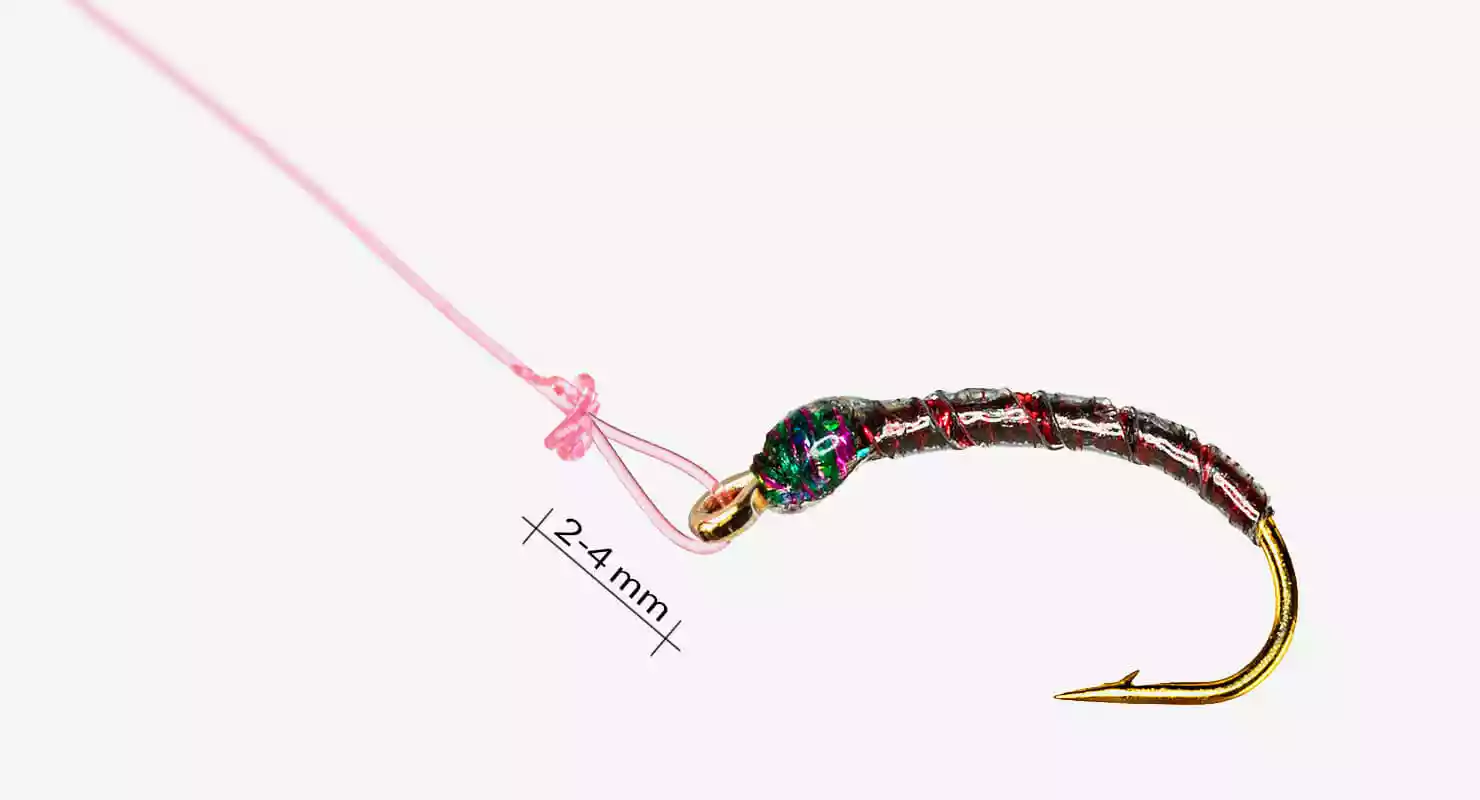
The small loop allows the nymph to move freely and naturally, closely imitating the twitching movements of ascending chironomid larvae
In the following video, we demonstrate how to attach the nymph to the side arm:
3.2. CONNECTING THE SIDE ARMS TO THE MAIN LINE
Now that the nymphs have been attached to the prepared sections of line using the loop knot, giving them maximum freedom of movement, we can incorporate these sections as side arms into the main line of the sabiki rig. To do this, pull the required length of line of the same diameter from the spool. But how long should the finished rig be? And where exactly should the side arms be positioned, and at what spacing? Before tying them in, let us take a closer look at these important considerations.
3.2.1. HOW LONG SHOULD A SABIKI RIG BE?
The ideal length of a sabiki rig depends on several factors, including whether the rig is intended for:
-
3 nymphs
-
5 nymphs
-
bottom fishing
-
open-water fishing
As a general rule, the overall length of the sabiki rig should not exceed 2 to 2.3 metres. Longer rigs become increasingly difficult to handle, whether fishing from the bank with a float rod or from a boat using the typically shorter jigging rods employed for whitefish fishing.
3.2.2. VERTICAL SPACING ON THE SABIKI RIG
Bottom-Fishing Sabiki: When fish are holding close to the lakebed and feeding on worms and emerging insect larvae, it makes sense to present your nymphs in a more concentrated zone. For this type of bottom-fishing rig, the distance between the weight and the first nymph should therefore not be excessive. A spacing of 10–15 cm is usually sufficient. The distance between individual nymphs can range from 20 to 30 cm. Likewise, the distance between the uppermost nymph and the top loop or swivel should be at least 30 cm.
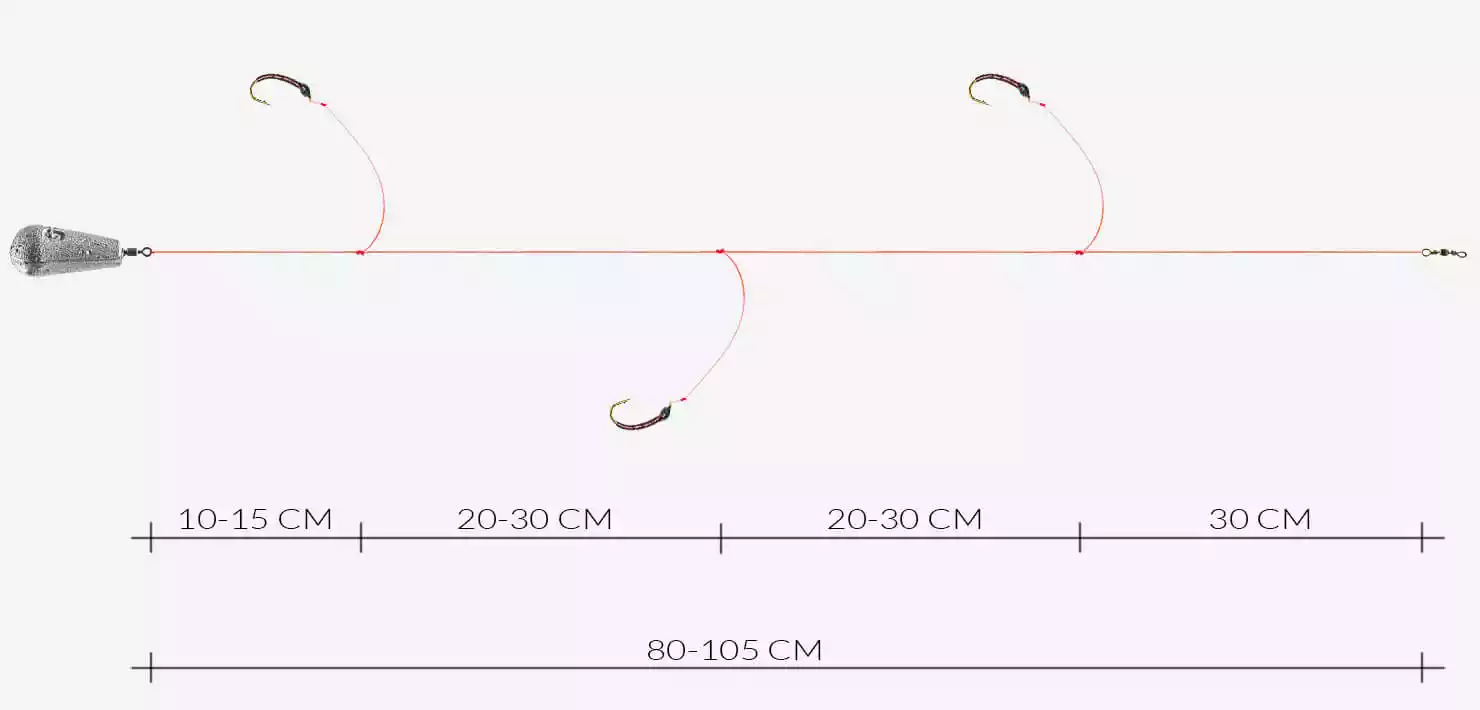
On a bottom-fishing sabiki, the distance between the weight and the first side arm should not be too great, ensuring that the lowest nymph remains close to the lakebed
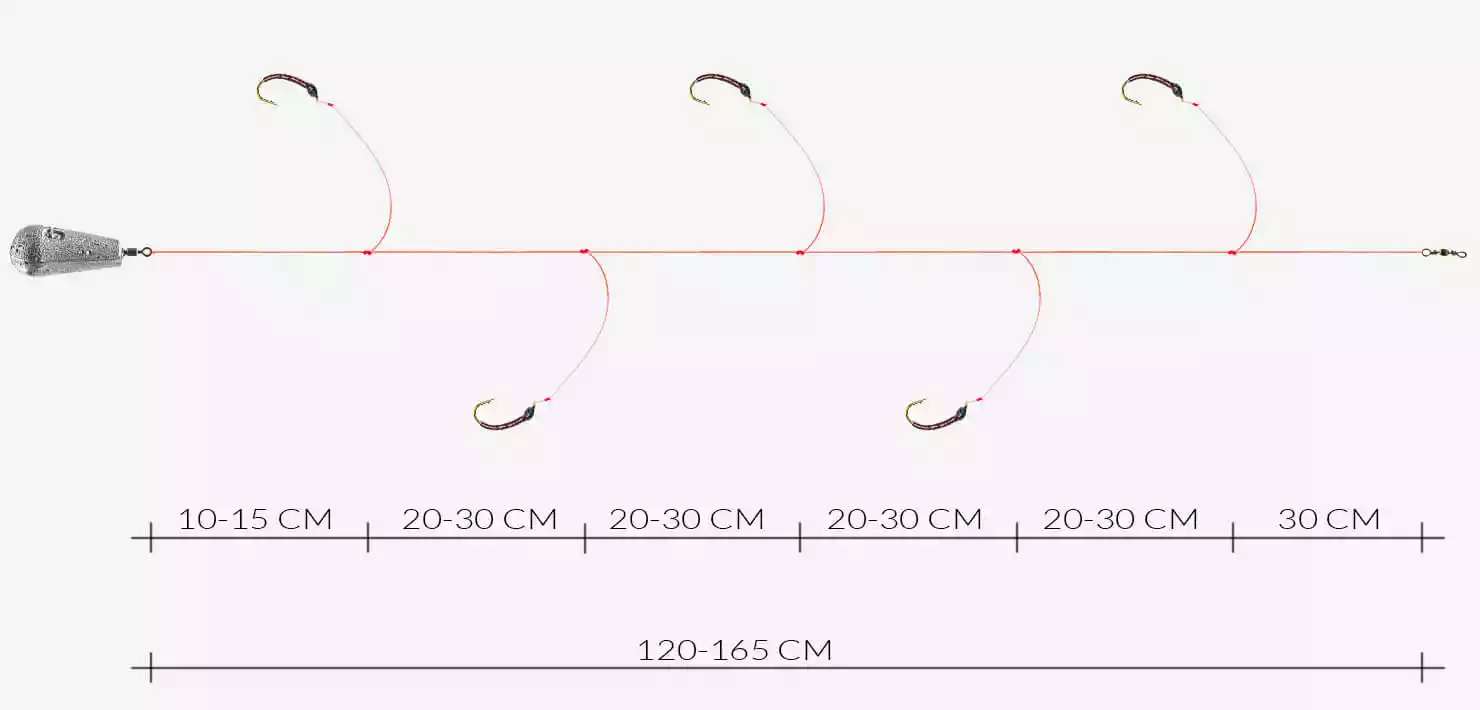
Even in the 5-nymph version, bottom-fishing sabikis remain relatively compact and easy to handle
Open-Water Sabiki: When fishing a sabiki in open water, the spacing should be increased. This allows you to cover a larger section of the water column while also reducing the influence of the weight, which is more visible when suspended in open water than when resting on the bottom. The distance between the lower attachment point of the weight and the first nymph should be at least 40 cm. Likewise, the spacing between individual nymphs can be increased to 40 cm on a 5-nymph rig and up to 50 cm on a 3-nymph rig. The distance between the uppermost nymph and the top loop or swivel should also be around 30 cm.
With a 5-nymph rig, these dimensions already bring you close to the recommended maximum overall length. A few centimetres more or less will not make a significant difference, and you should feel free to adjust the spacing to suit the conditions on your local waters. The goal is to create a rig that fishes effectively while remaining comfortable and efficient to handle.
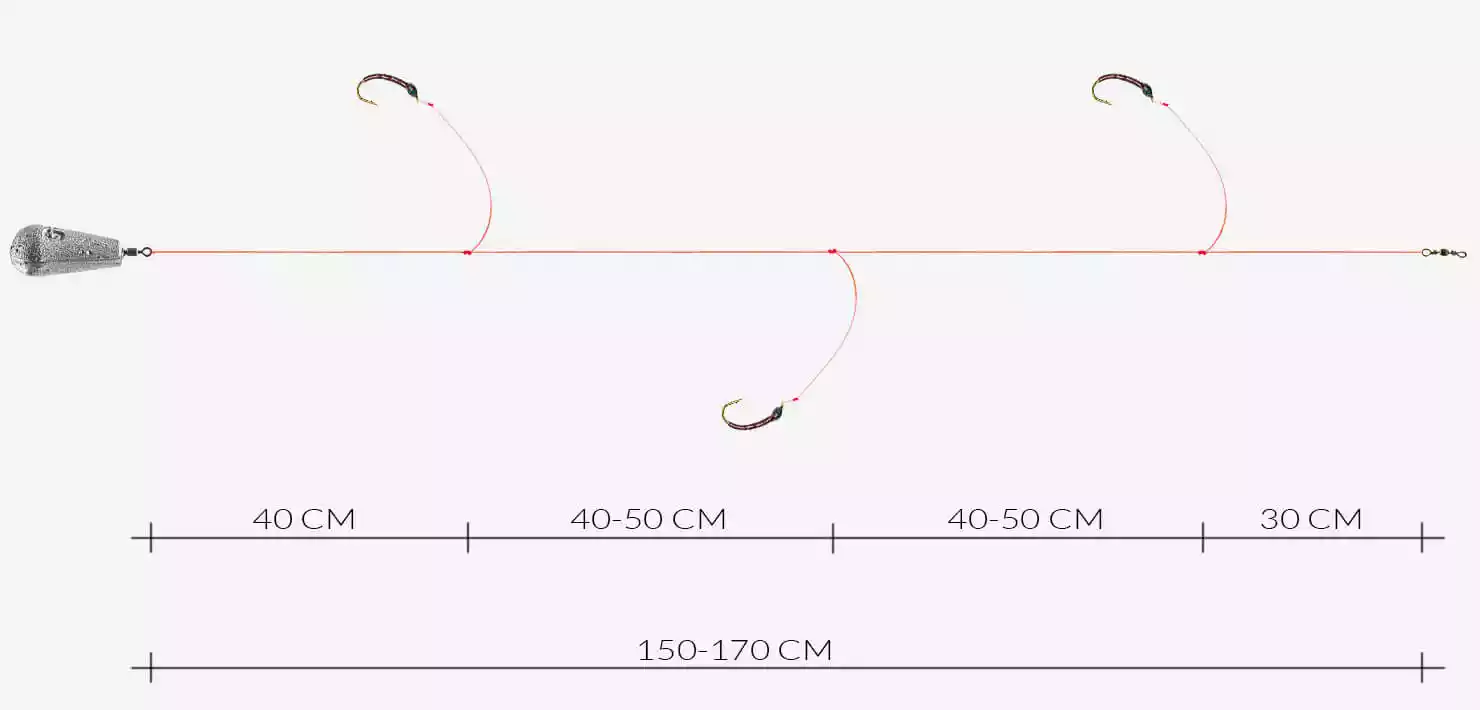
Open-water sabikis feature greater spacing between the side arms to cover a larger section of the water column
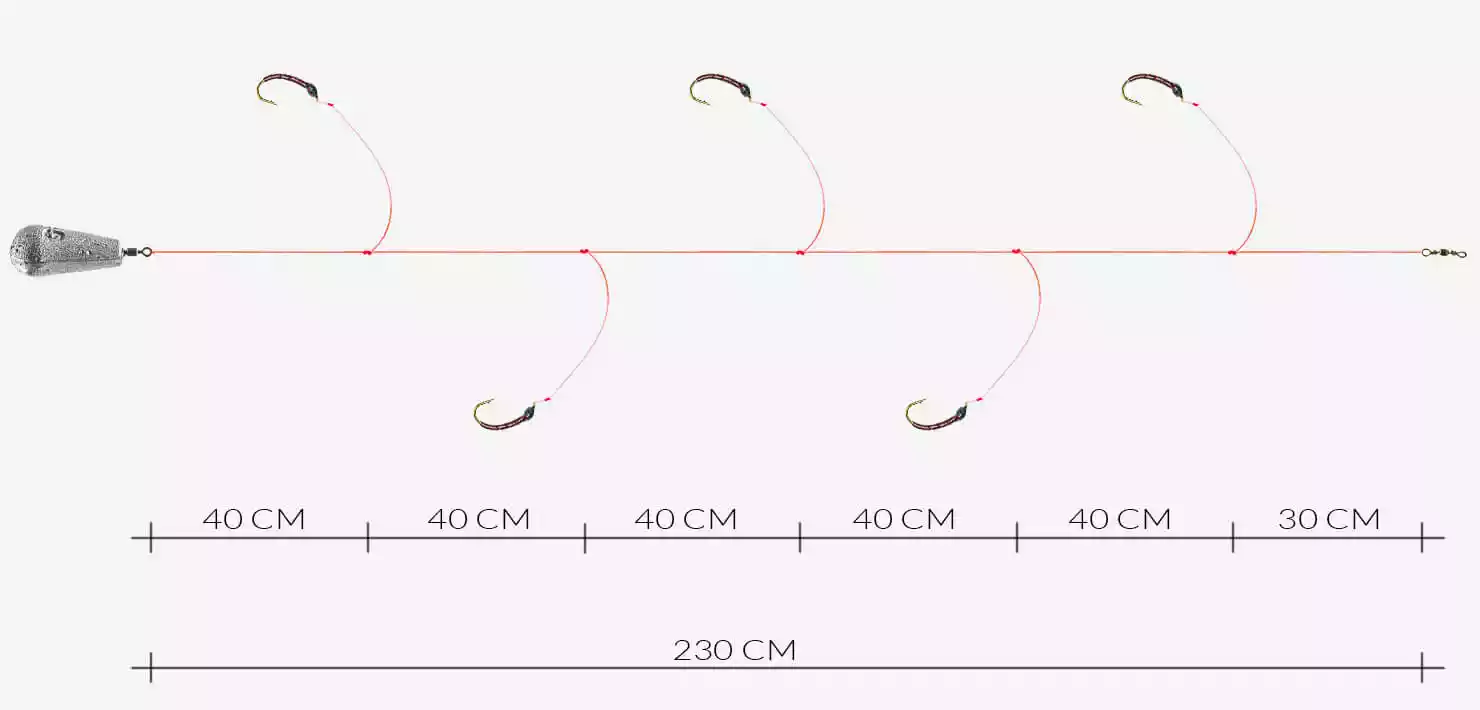
With five nymphs, an open-water sabiki can become quite long. Adjust the spacing so that casting, fishing and netting remain comfortable and efficient
3.3. ATTACHING THE SIDE ARM
Now that we have determined both the overall length of the sabiki rig and the spacing of the individual components on the main line, we can begin attaching the side arms. Here, too, we use a very simple knot that allows the side arm to stand away from the main line with a spring-like action, giving the nymph a lively and natural movement. Another advantage of our method is its efficiency, as even when tying the doubled knot, you only need to pass the entire main line through the loop once.
To begin, position the nymph on the side arm parallel to the main line of the sabiki rig. For maximum efficiency, we always start with the uppermost nymph. This prevents you from having to pull already attached nymphs through subsequent loops while tying in the remaining side arms. Position the uppermost side arm while leaving enough line above it to later add the desired spacing as well as a loop or swivel at the top of the rig.
The two parallel strands are then formed into a loop, with the end of the side arm carrying the nymph and the upper section of the main line lying on top. The loop should be large enough to comfortably fit your index and middle fingers. Next, twist the loop one additional turn using these two fingers, then reach through the loop, grab the two line ends lying behind it and pull them forwards through the opening.
Make it a habit to always pull the rear line ends through the loop, even though this may initially require you to pull a longer section of main line through the knot. The advantage is that the rear section does not carry a nymph, preventing it from becoming tangled in the loop. A single full twist is entirely sufficient. This keeps the knot compact and unobtrusive. Most importantly, you only need to pass the line ends through the loop once.
As with the loop knot used on the nymph, a needle or toothpick is extremely useful for determining the final length of the side arm. Ideally, the side arm should measure between 2 and a maximum of 4 cm. At this length, it will stand neatly away from the main line and allow the nymph to pulse naturally with every movement. This closely imitates the twitching movements of emerging chironomid larvae.
Longer side arms, especially when tied from finer diameters, increase the risk of the nymph hanging limp rather than standing out properly. They can also result in more missed takes, as the subtle bite is transmitted less directly to the rod tip and a European whitefish may already have rejected the nymph before the angler notices the take. Short side arms also improve self-hooking when fishing under a float.
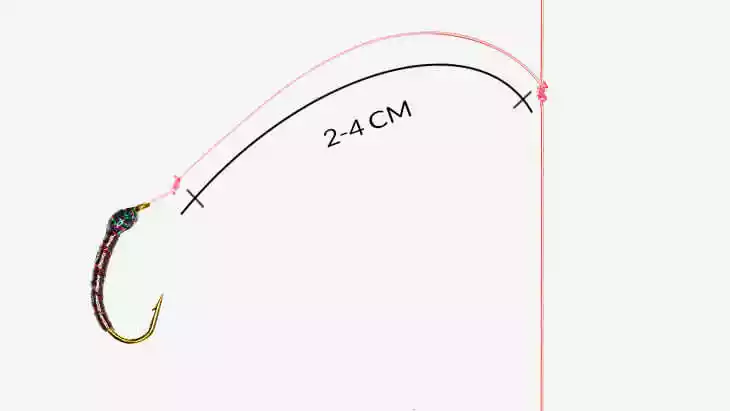
2–4 cm is ideal, allowing the side arm to stand out properly and the nymph to pulse naturally
Probably the most important detail: the side arm must point upwards (!)
The written description of this knot sounds more complicated than it actually is. Simply watch the following video. Here, we demonstrate how easy and fast it is to attach side arms to your sabiki rig. After only a few attempts, you will be tying them almost automatically:
TIP: To avoid measuring every side arm individually, mark the required lengths and distances on a small board or even a sheet of paper. While tying, you can simply compare the line against these reference marks. This saves time and helps produce more consistent sabiki rigs.
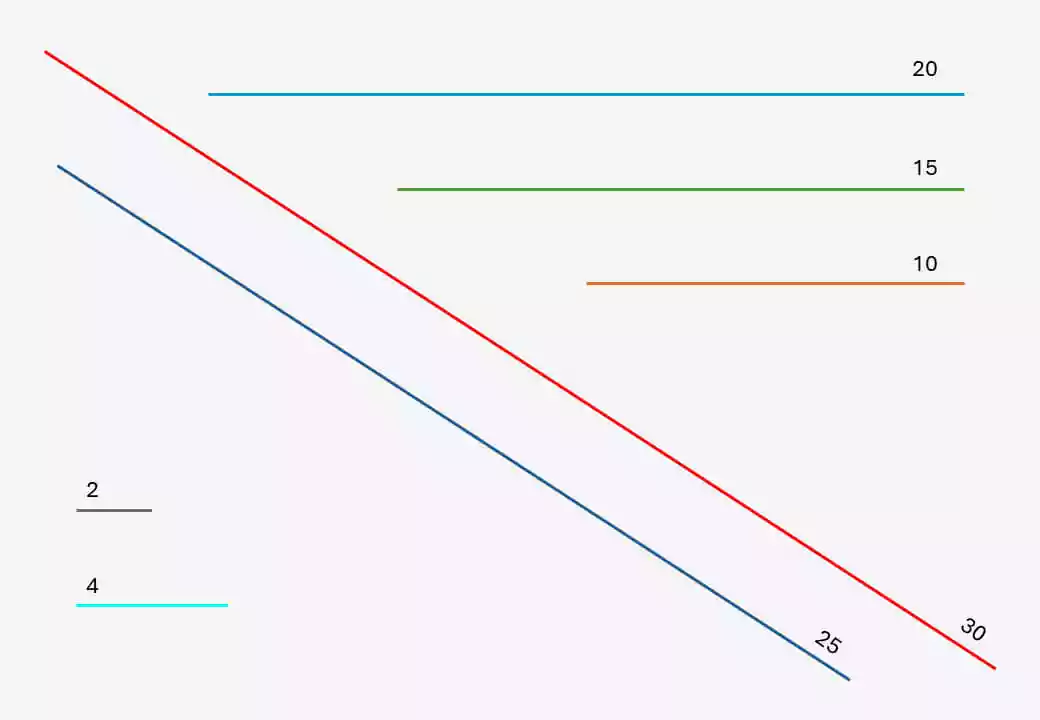
Mark the most important dimensions on a sheet of paper. When tying sabiki rigs, simply align the line with the reference marks to quickly and accurately determine the correct distances.
3.4. FINISHING THE MAIN LINE
You have now attached the side arms at the correct intervals and ensured that they point upwards and stand neatly away from the main line. During fishing, the sabiki rig is connected at the top end using a snap attached to the main line of the jigging or float rod. A weight is attached at the lower end of the rig. In principle, two simple loops are all that is required, although the lower loop should be large enough to allow the weight to be attached and removed easily, as demonstrated in the following video.
At the lower end, however, we strongly prefer to incorporate a snap swivel. Firstly, it significantly reduces line twist. Secondly, it makes attaching and removing the weight much faster and more convenient. If, for example, a 5-nymph rig becomes hopelessly tangled in the landing net, removing the weight often makes it much easier to untangle everything.
At the upper end, we also attach a small swivel, allowing the snap on your rod's main line to be connected quickly and securely.
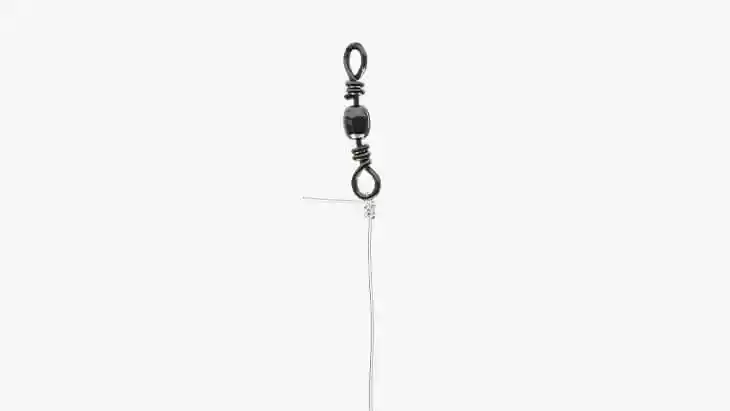
Swivel at the top end of the sabiki rig ...
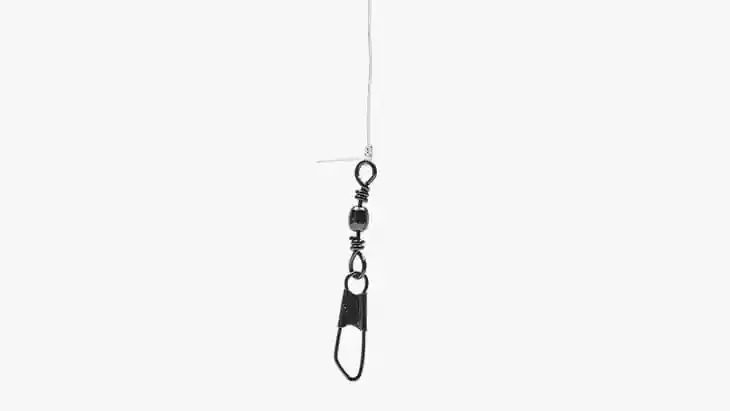
... and a snap swivel for attaching the weight at the bottom end
Using two different types of swivels – one with a snap and one without – also makes it immediately obvious which end of the rig is the top and which is the bottom. As we have already seen, the side arms must be oriented correctly so that they point upwards and stand away from the main line. For this reason, the sabiki rig must always be rigged the correct way around. Otherwise, the side arms will collapse against the main line rather than standing out properly.
4. STORING AND WINDING SABIKI RIGS CORRECTLY
Your handmade sabiki rig is now complete and ready for use. To store your rigs neatly, keep them organised and transport them safely, we recommend using round foam rig winders together with the appropriate pouches or storage boxes.
This allows you to find the rig you need immediately, while the numerous nymphs remain securely embedded in the foam and cannot tangle with one another. Pins are used to secure both ends of the sabiki rig to the winder. By using different coloured pin heads, you can also create your own colour-coding system, for example based on line diameter or side-arm spacing. Alongside many other useful accessories, you will also find these practical rig winders in our online shop.
Incidentally, these winders are also excellent for preparing fly fishing leaders at home. This allows you to react quickly to changing conditions on the water and switch to the most suitable leader whenever required.
Have fun and, of course, tight lines with your hand-tied sabiki rigs!
5. FREQUENTLY ASKED QUESTIONS ABOUT TYING SABIKI RIGS
CONTENTS:
Fluorocarbon is generally the best choice for tying sabiki rigs. It is far less visible underwater than nylon because its refractive index is very close to that of water. In addition, fluorocarbon is slightly stiffer, allowing the droppers to stand away from the main line more effectively and giving the nymphs a more natural movement.
A diameter of 0.18 mm has proven highly effective for whitefish. In exceptionally clear water, 0.16 mm can also be a good option. For perch, shad, trout, or other larger target species, anglers often use diameters between 0.20 and 0.25 mm.
As a rule of thumb, a sabiki rig should not exceed 2 to 2.3 metres in length. Longer rigs are more difficult to cast, control, and net, whether fishing from shore with a float rod or from a boat with a jigging rod.
The permitted number of nymphs depends on the fishing regulations of the water you are fishing. While some lakes allow sabiki rigs with five nymphs, others permit only three.
The ideal dropper length is between 2 and 4 centimetres. Shorter droppers help the nymphs stand away from the main line, improve their action, and transmit bites more directly.
Upward-facing droppers stand away cleanly from the main line when submerged. This allows the nymphs to move freely and imitate emerging chironomid larvae in a highly realistic manner.
The loop directly in front of the nymph should measure approximately 2 to 4 millimetres. This gives the nymph enough freedom of movement to behave naturally in the water and appear more attractive to fish.
A simple loop knot has proven particularly effective. It is quick to tie, highly reliable, and gives the nymph maximum freedom of movement.
On a bottom-fishing sabiki rig, the distance between individual nymphs is typically between 20 and 30 centimetres. The distance from the sinker to the lowest nymph should be around 10 to 15 centimetres.
A midwater sabiki rig uses larger spacing. Distances of 40 to 50 centimetres between nymphs are common, while the distance from the sinker to the first nymph should be at least 40 centimetres.
A bottom-fishing sabiki rig is used when fish are feeding close to the lakebed. The nymphs are presented just above the bottom where fish are actively searching for food.
A midwater sabiki rig is ideal when whitefish are holding higher in the water column. The greater spacing between nymphs covers a larger depth range and helps locate the fish's feeding depth more quickly.
Yes. Sabiki rigs can be tied very successfully with nylon. At the same diameter, nylon generally offers higher breaking strength and is more affordable than fluorocarbon. However, it is more visible underwater and softer, which means the droppers do not stand away from the main line as effectively.
The best option is to store sabiki rigs on round foam rig winders. This keeps the droppers straight, prevents the nymphs from tangling, and ensures the rig is always ready to fish.
Hand-tied sabiki rigs can be tailored precisely to a specific water, the permitted number of nymphs, the target fishing depth, and the most productive nymph patterns. In addition, damaged rigs can be repaired or rebuilt easily.
Both versions have their advantages. A 3-nymph rig is easier to cast, land fish with, and untangle. A 5-nymph rig covers a larger section of the water column and allows you to test several different nymph patterns at the same time.
The most common causes are line material that is too soft or too thin, droppers that are too long, droppers tied to point downward, or an incorrectly tied knot. Fluorocarbon combined with upward-facing droppers measuring 2 to 4 centimetres usually provides the best results.
Yes. In many cases, replacing a single nymph is all that is required. This usually involves tying in a new dropper. Alternatively, you can use the remaining nymphs to build an entirely new rig. This is one of the main reasons why learning the essential knots is so useful.
Sabiki rigs are used primarily for whitefish. Depending on the water and presentation, they can also be highly effective for perch, char, trout, shad, and various other species. They perform especially well wherever fish feed on chironomid larvae and other small aquatic organisms.
For most situations, fluorocarbon offers clear advantages because it is less visible underwater and helps the droppers stand away from the main line. Nylon, on the other hand, provides greater breaking strength at the same diameter and is generally less expensive.
The correct depth depends entirely on where the fish are holding. On some days they feed close to the bottom, while on others they suspend in midwater. If you do not have access to a fish finder—or if using one is not permitted—the only solution is to actively search different depths until you locate the fish.
When a sabiki rig fails to produce fish, the cause is often incorrect depth, unsuitable nymph patterns, or an unnatural presentation. Simply adjusting the fishing depth, changing nymph colours, or imparting a little extra action to the nymphs with subtle rod movements can often make a significant difference.
Nymphs that imitate chironomid larvae and pupae are among the most effective options. However, the best colour and pattern depend on the water, the season, and the fish's current food sources. For this reason, experienced sabiki anglers often carry a range of different colours and patterns.
Both options have advantages. Ready-made sabiki rigs offer proven nymph combinations and carefully optimised spacing. Hand-tied rigs, however, can be tailored precisely to the conditions of your local water, the permitted number of nymphs, and your personal preferences.

This might also interest you:

Breathable waders - buying guide
Breathable waders are nowadays an essential piece of fly fishing equipment. But what really matters when buying a new pair of breathable waders? In this guide you will find all the information you need to make choosing the right waders easier.

Connecting leader to fly line: This is how it works!
In this compact service guide, we show you how to quickly and easily connect fly line and leader. Different methods for fly lines with and without prefabricated loops as well as the best knots in easy-to-understand video tutorials. Of course, we also include one or two extra tips.
Breathable waders - buying guide
Breathable waders are nowadays an essential piece of fly fishing equipment. But what really matters when buying a new pair of breathable waders? In this guide you will find all the information you need to make choosing the right waders easier.
Connecting leader to fly line: This is how it works!
In this compact service guide, we show you how to quickly and easily connect fly line and leader. Different methods for fly lines with and without prefabricated loops as well as the best knots in easy-to-understand video tutorials. Of course, we also include one or two extra tips.

The fly fishing paradise on the doorstep
In this blog post, we tell you how a planned afternoon of fishing with guide Diego Riggi from Fly Fishing Dolomitico turned into a cosy aperitivo and why Diego now lives in paradise.

Dream job fishing guide? The big interview
For many, it sounds too tempting: making a living from fly fishing. But what does the day-to-day work of a professional fishing guide actually look like? We asked the certified EFFA flycasting instructor and fishing guide Arnold Gufler.

Fishing with the Jumping Jack rig – super simple and extremely effective
How to successfully catching trout and grayling in the large alpine rivers with a fly? It's easier than you think with the Jumping Jack. We have compiled everything you need to know in this guide.


